


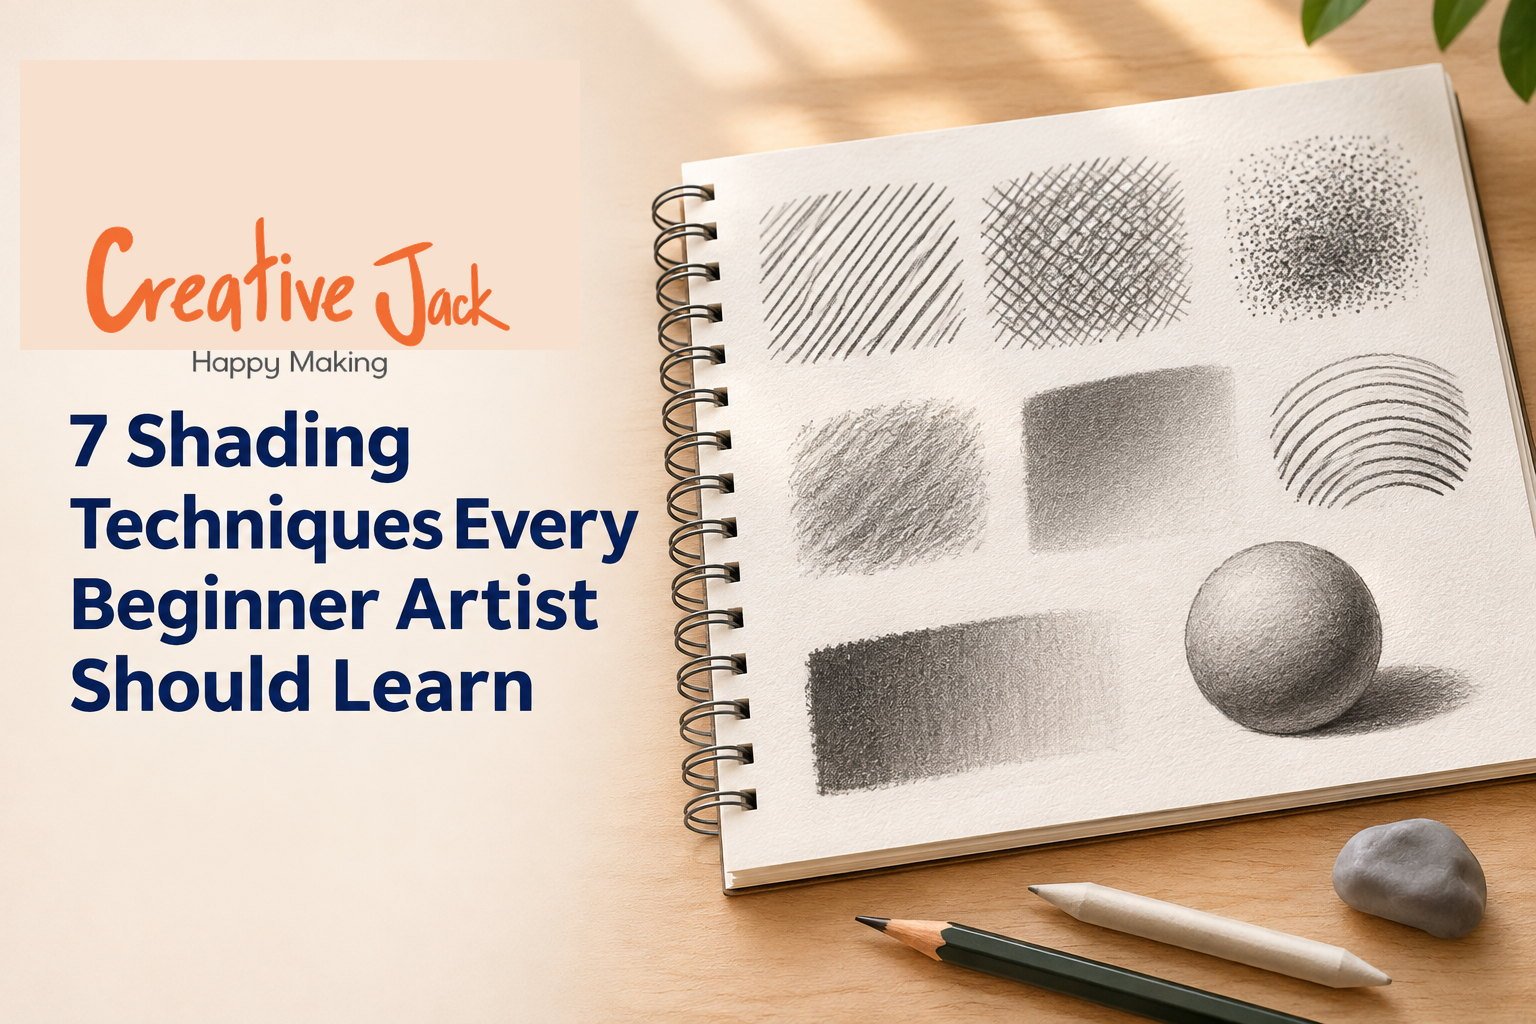
7 Shading Techniques Every Beginner Artist Should Learn
The seven shading techniques every beginner should learn are hatching, cross-hatching, contour hatching, stippling, scumbling, smooth blending, and layered tonal build up. Each one turns a flat outline into something that looks solid by showing where light falls and where it does not. You do not need to master all seven at once. Learn two or three, practise them on a sphere, then use them on real objects.
What You'll Find in This Guide
• Why shading is what makes a drawing look three-dimensional
• Seven shading techniques, with how to practise each one
• A simple value scale exercise you can do today
• Common shading mistakes and how to fix them
• How to choose which technique to use
Why Your Drawings Look Flat
If you draw a perfect outline of an apple and it still looks like a sticker on the page, the problem is not your outline. It is the lack of tone. Real objects are not the same brightness all over. One side catches the light, another turns away from it, and the table beneath throws a shadow. Our eyes read those differences as form.
Shading is simply the art of recording those differences, and learning how to shade a drawing is the quickest way to make it look solid. Once you understand it, you can make a circle look like a ball, a tube look like a cylinder, and a face look like a face.
First, Understand Value
Value means how light or dark something is. A value scale is a strip of boxes that goes from white, through greys, to black. Drawing one is the best warm-up for any shading session.
Exercise: a five-step value scale. Draw a row of five squares. Leave the first one white. Fill the last one as dark as your pencil allows. Fill the middle three so that each step is slightly darker than the one before. It sounds easy. It is surprisingly hard to make the steps even, and it teaches you control.
Once you can make smooth steps, shading becomes much more predictable. If you need advice on which pencils to use, see our guide to drawing pencil types.
Technique 1: Hatching
Hatching means drawing parallel lines close together. The closer the lines, the darker the tone. Spread them out and the area looks lighter.
How to practise: Fill a small square with straight, parallel diagonal lines. Make a second square with the lines closer together. Make a third even tighter. You now have three different values created with only lines.
Tips: Keep the lines in one direction and as evenly spaced as you can. Draw with a flick of the wrist rather than pushing the pencil slowly. A sharp pencil gives cleaner lines.
Good for: Quick sketches, graphic effects, and giving drawings a visible, hand-drawn texture.
Technique 2: Cross-Hatching
Cross-hatching adds a second set of lines over the first, at an angle. A third layer in another direction makes the tone darker still.
How to practise: Fill a square with diagonal hatching. Add a second layer at the opposite angle. For a darker value, add a third layer, horizontal or vertical.
Tips: Change direction slightly with each layer, and keep your lines light. Pressing hard makes the grid obvious. Building up lightly gives you a more even tone.
Good for: Strong contrast, pen and ink, and mid-to-dark values with a lot of texture.
Technique 3: Contour Hatching
In contour hatching, your lines follow the shape of the object instead of running in a straight direction. On a sphere, the lines curve around it. On a cylinder, they wrap around like rings.
How to practise: Draw a circle and add curved hatching lines that follow its roundness, closer together on the shadow side and wider apart where the light hits.
Tips: Imagine the lines as bands wrapped around the form. This helps you see volume as you draw.
Good for: Showing form clearly, especially on curved objects, fabric, and portraits.
Technique 4: Stippling
Stippling uses tiny dots to build tone. More dots mean darker areas. Fewer dots mean lighter ones.
How to practise: Fill a small circle with dots, packing them tightly on one side and leaving them sparse on the other.
Tips: Use a sharp pencil or a fine pen, and be patient. Stippling is slow, but it gives beautifully controlled, grainy tones.
Good for: Fine detail, texture such as skin, stone, or sand, and when you want a clear, graphic look.
Technique 5: Scumbling
Scumbling means drawing small, overlapping circles or loose scribbles to build tone. It looks random, and it gives you soft, textured shading.
How to practise: Use the side of the pencil lead and make loose circular movements across a square. Build slowly, keeping your hand light.
Tips: Vary the size of the loops so the texture feels natural. Don't press too hard.
Good for: Organic textures like tree bark, clouds, fur, and rough surfaces.
Technique 6: Smooth Blending
Blending softens the lines and grains of graphite into a smooth tone. You can use a blending stump, a tissue, a soft brush, or even a finger, though skin oils can leave marks.
How to practise: Shade a square lightly with a 2B pencil. Rub gently with a blending stump in small circles until the marks disappear into a smooth tone. Add more graphite on top and blend again for darker values.
Tips: Shade first, then blend. Don't blend too early or you will lose your lighter tones. Keep a clean stump for light areas and a separate one for dark.
Good for: Skin, sky, glass, and any surface that looks smooth.
Technique 7: Layered Tonal Build-Up
This is the technique most realistic drawings rely on. Instead of pressing hard, you build tone in many thin layers, moving from light to dark.
How to practise: Shade a sphere. Start with a very light layer over the whole form except the brightest highlight. Add a second layer over the midtones and shadow side. Add a third layer to the darkest areas, and a final thin layer for the cast shadow beneath it.
Tips: Work from light to dark, and leave your lightest areas untouched from the beginning. It is far easier to darken than to lighten.
Good for: Realistic drawings of almost any subject.
Choosing the Right Technique
A quick way to decide:
• Want clear, graphic lines? Hatching or cross-hatching.
• Want to show form on a curved object? Contour hatching.
• Want a textured look? Stippling or scumbling.
• Want a soft, smooth result? Blending or layered build-up.
Most finished drawings combine several. A portrait might use layered build-up for the skin, hatching for the hair, and stippling for texture.
Understanding Light on a Form
Whatever technique you choose, the logic of light stays the same. On any rounded object you will usually see:
1. Highlight: the brightest spot where light hits directly.
2. Light tone: the lit area around it.
3. Mid-tone: where the form begins to turn away.
4. Core shadow: the darkest band on the object itself.
5. Reflected light: a slightly lighter edge in the shadow, bounced from nearby surfaces.
6. Cast shadow: the shadow on the surface beneath.
If you draw all six on a sphere, you will have the core of how shading works.
Common Shading Mistakes
Pressing too hard too early. You lose the ability to adjust. Build slowly.
Outlining too heavily. Real objects do not have thick black outlines. Let tone define the edge.
Shading flat and even. If every area is the same tone, the drawing stays flat. Aim for a clear range from light to dark.
Forgetting the cast shadow. Without it, objects float.
Smudging by accident. Rest your hand on a scrap sheet of paper.
You will find more of these in 10 common drawing mistakes beginners make.
Practise Plan for One Week
• Day 1: Value scale and hatching squares.
• Day 2: Cross-hatching and contour hatching on a sphere.
• Day 3: Stippling and scumbling squares.
• Day 4: Blending and layered build-up on a sphere.
• Day 5: Shade a real egg or ball under a lamp.
• Day 6: Shade a simple object like a cup, using any technique.
• Day 7: Review, and pick your favourite technique to practise next week.
See Shading in Action
Watching someone build up tone helps enormously. You can find demonstrations on the Creative Jack YouTube channel, and see finished shaded work on our Instagram.
How Creative Jack Teaches Light and Shadow
Light and shadow are central to our Professional Art Course, which develops an understanding of tonal values, highlights, shadows, and contrast across charcoal and other mediums. If you are comparing a drawing painting course with a pure drawing class, check that tone and value are taught clearly, since every painting depends on them. Our Pencil Drawing category focuses on realism portrait work, where shading carries the whole drawing. Many drawing painting classes rush through shading to get to colour, and it shows later, so ask how much time is spent on it.
FAQs
What is the easiest shading technique for beginners? Hatching is the simplest. It only needs parallel lines and teaches you how spacing affects tone.
What is the difference between hatching and cross-hatching? Hatching uses lines in one direction. Cross-hatching adds layers of lines in other directions to build darker tones.
Should I blend my pencil shading? It depends on the effect you want. Blending gives a smooth, soft look, while unblended shading keeps a visible texture.
What pencil is best for shading? A 2B or 4B is a good starting point, with an HB for lighter areas.
How do I get smooth shading without streaks? Use light pressure, build in thin layers, and shade in small circles or in one consistent direction.
Why does my shading look patchy? It usually means uneven pressure or too few layers. Slow down and build up gradually.
Can I use these techniques with charcoal? Yes. The same principles apply, though charcoal smudges more easily and gives deeper blacks.
Learning Shading in Mumbai, Navi Mumbai, Thane, and Pune
If you want help with shading in person, our Professional Art Course is listed at Art Station Andheri West, Khar West, CBD Belapur, FC Road Pune, and Mango Stationery in Thane West. A teacher can look at your tone and tell you immediately where it is going wrong.
Want Feedback on Your Shading?
Book a free trial class or message us on WhatsApp, and bring your sketchbook.
Related reads: Drawing Pencil Types Explained | How to Draw Realistic Portraits | How to Improve Your Sketching Skills: 10 Drawing Exercises